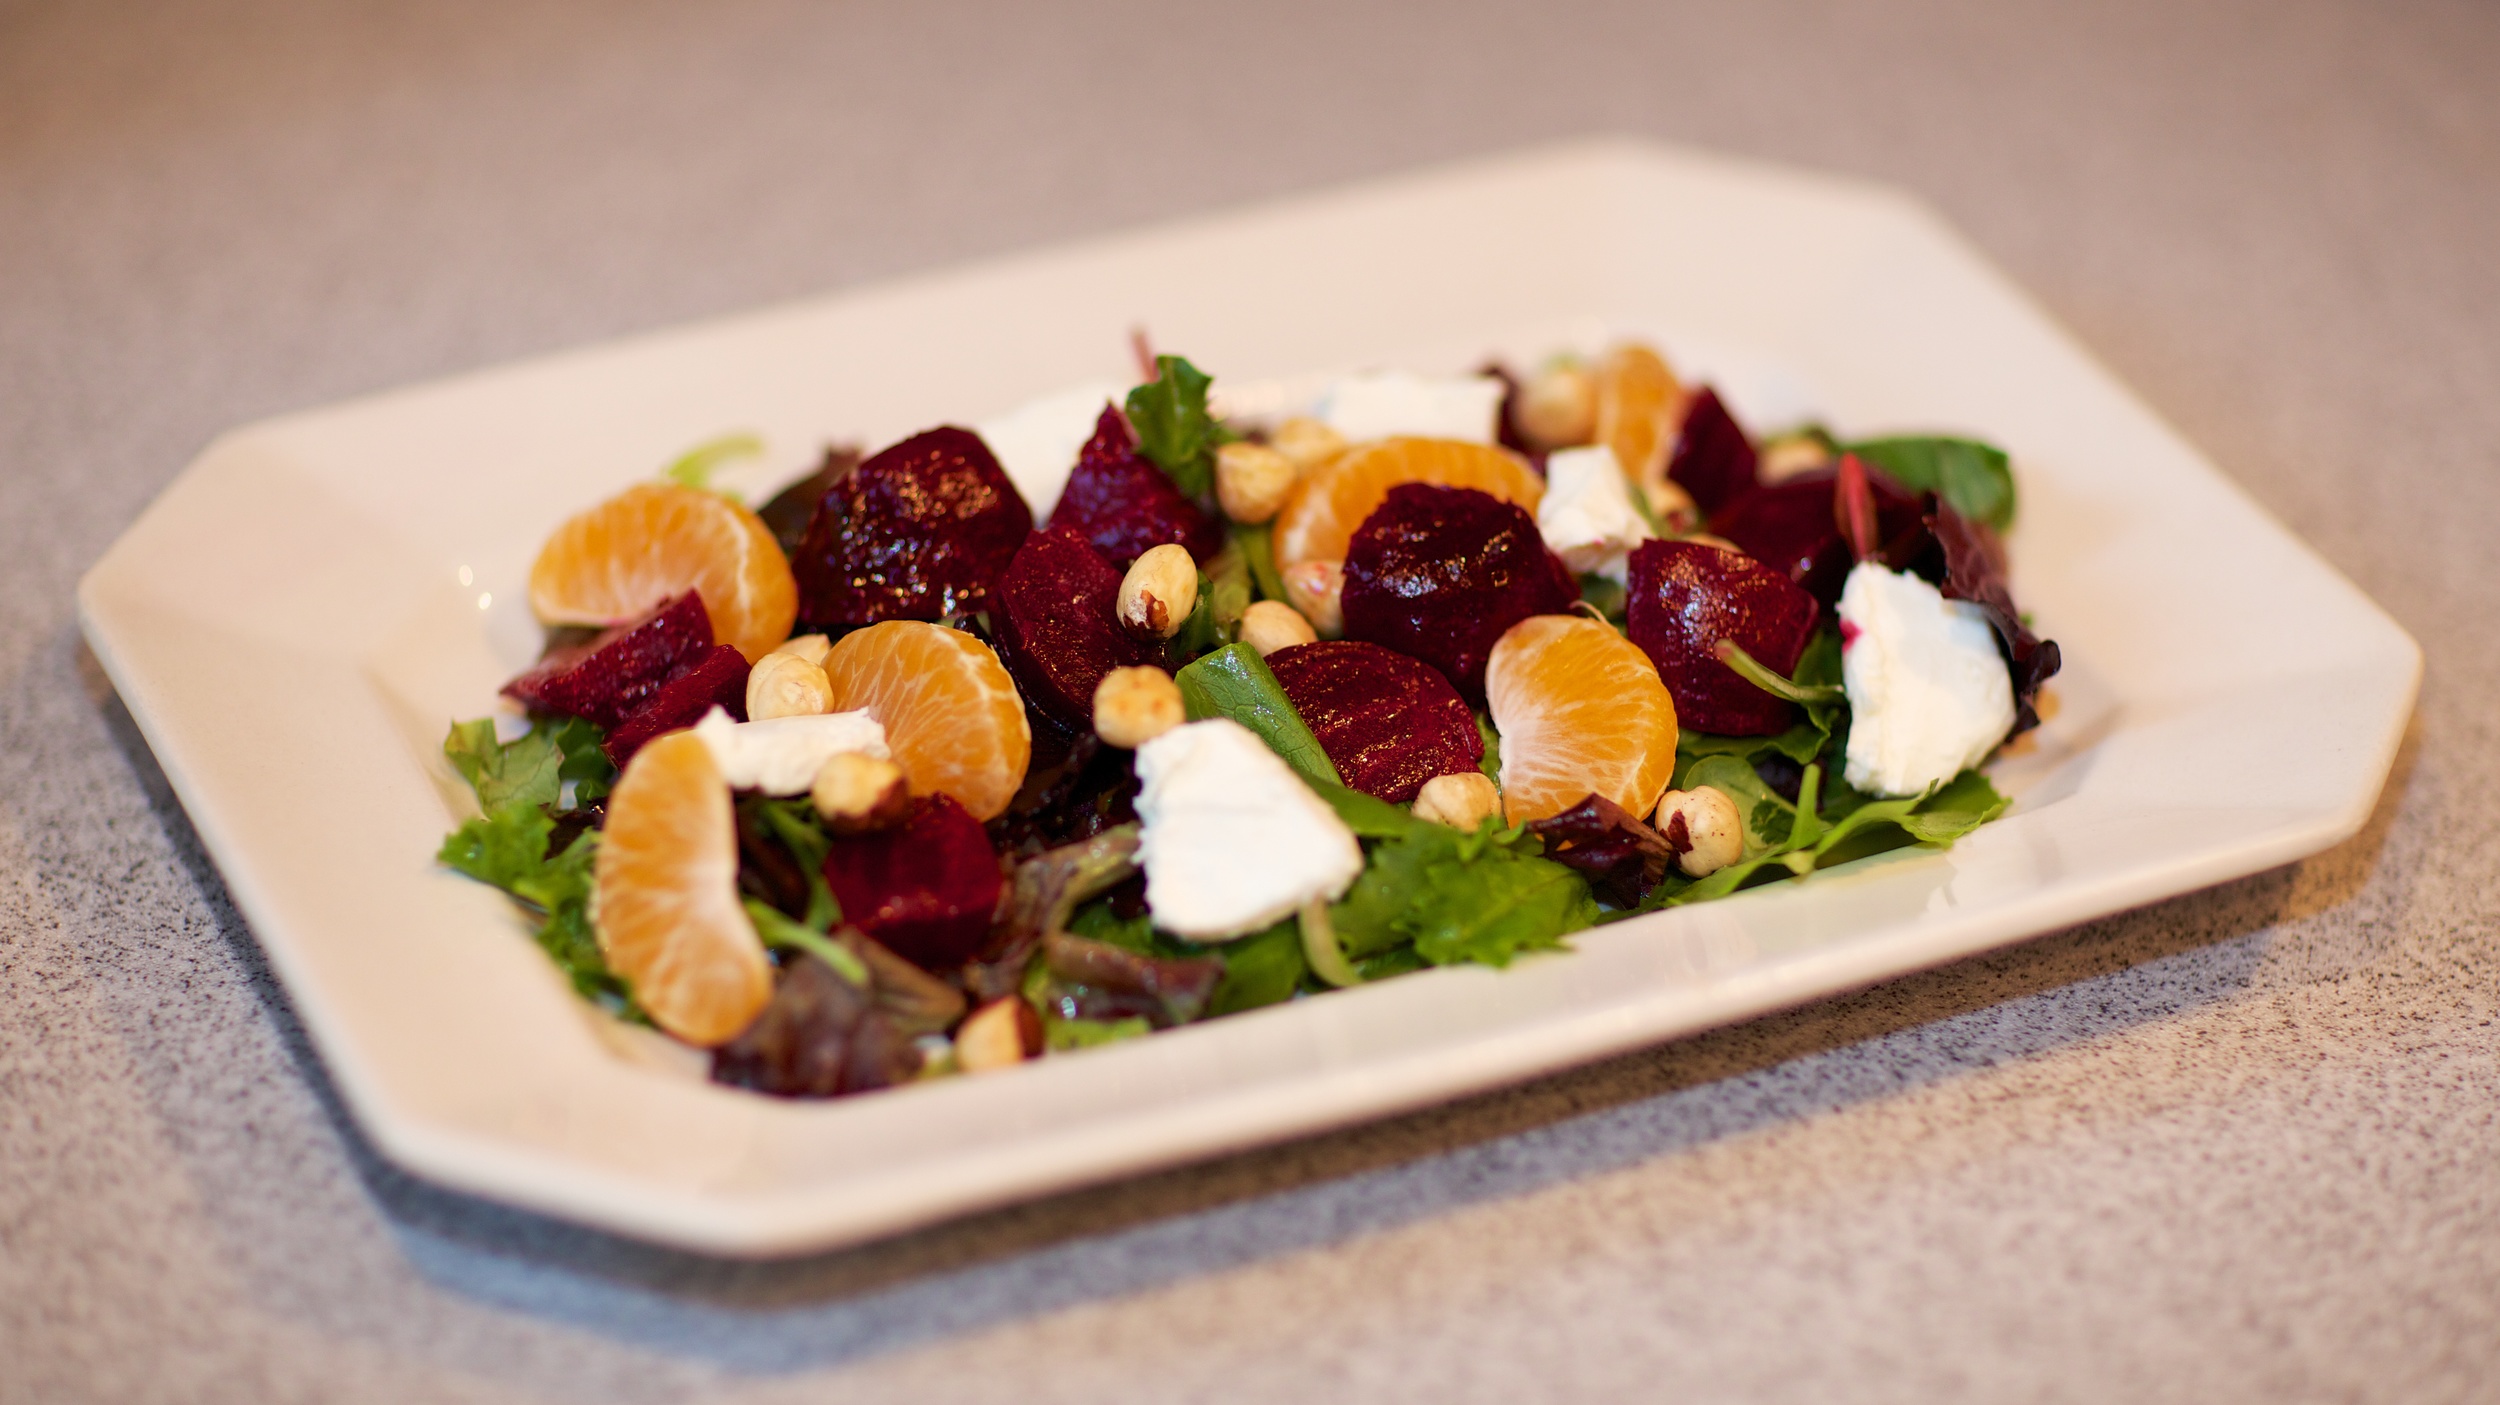
Sweet • Sour • Savory

Sweet • Sour • Savory

Food blog on scandinavian style food done right.

Roasted Beet Salad

Sides, Salad, VegetablesComment
Roasted Beet Salad.

Roasted Beet Salad.

I love to have beet salads when we are dining out. So why not try making it myself?  I had the Roasted beet salad from Thomas Kellers cookbook 'Bouchon', and the beets were fantastic. But I missed a soft cheese element and the crunchy nuts. 


This is my take on a Roasted beet salad:

Serves 4

Ingredients: 


Baked beets: 

  • 3 beets (about the size of tennis balls)

  • 2 tablespoons extra virgin olive oil

  • 2 tablespoons water

  • 1/2 teaspoon salt

  • 1/4 teaspoon pepper

Beet salad: 

  • 100 g mixed salad

  • a handful hazelnuts

  • 113 g goat cheese

  • 1-2 clementine

Dressing: 

  • 1 tablespoon extra virgin olive oil

  • 1/2 teapoon white wine vinegar

  • 2-3 tablespoons fresh orange juice

  • salt & pepper.


Direction: 

Preheat the oven to 375°F. 
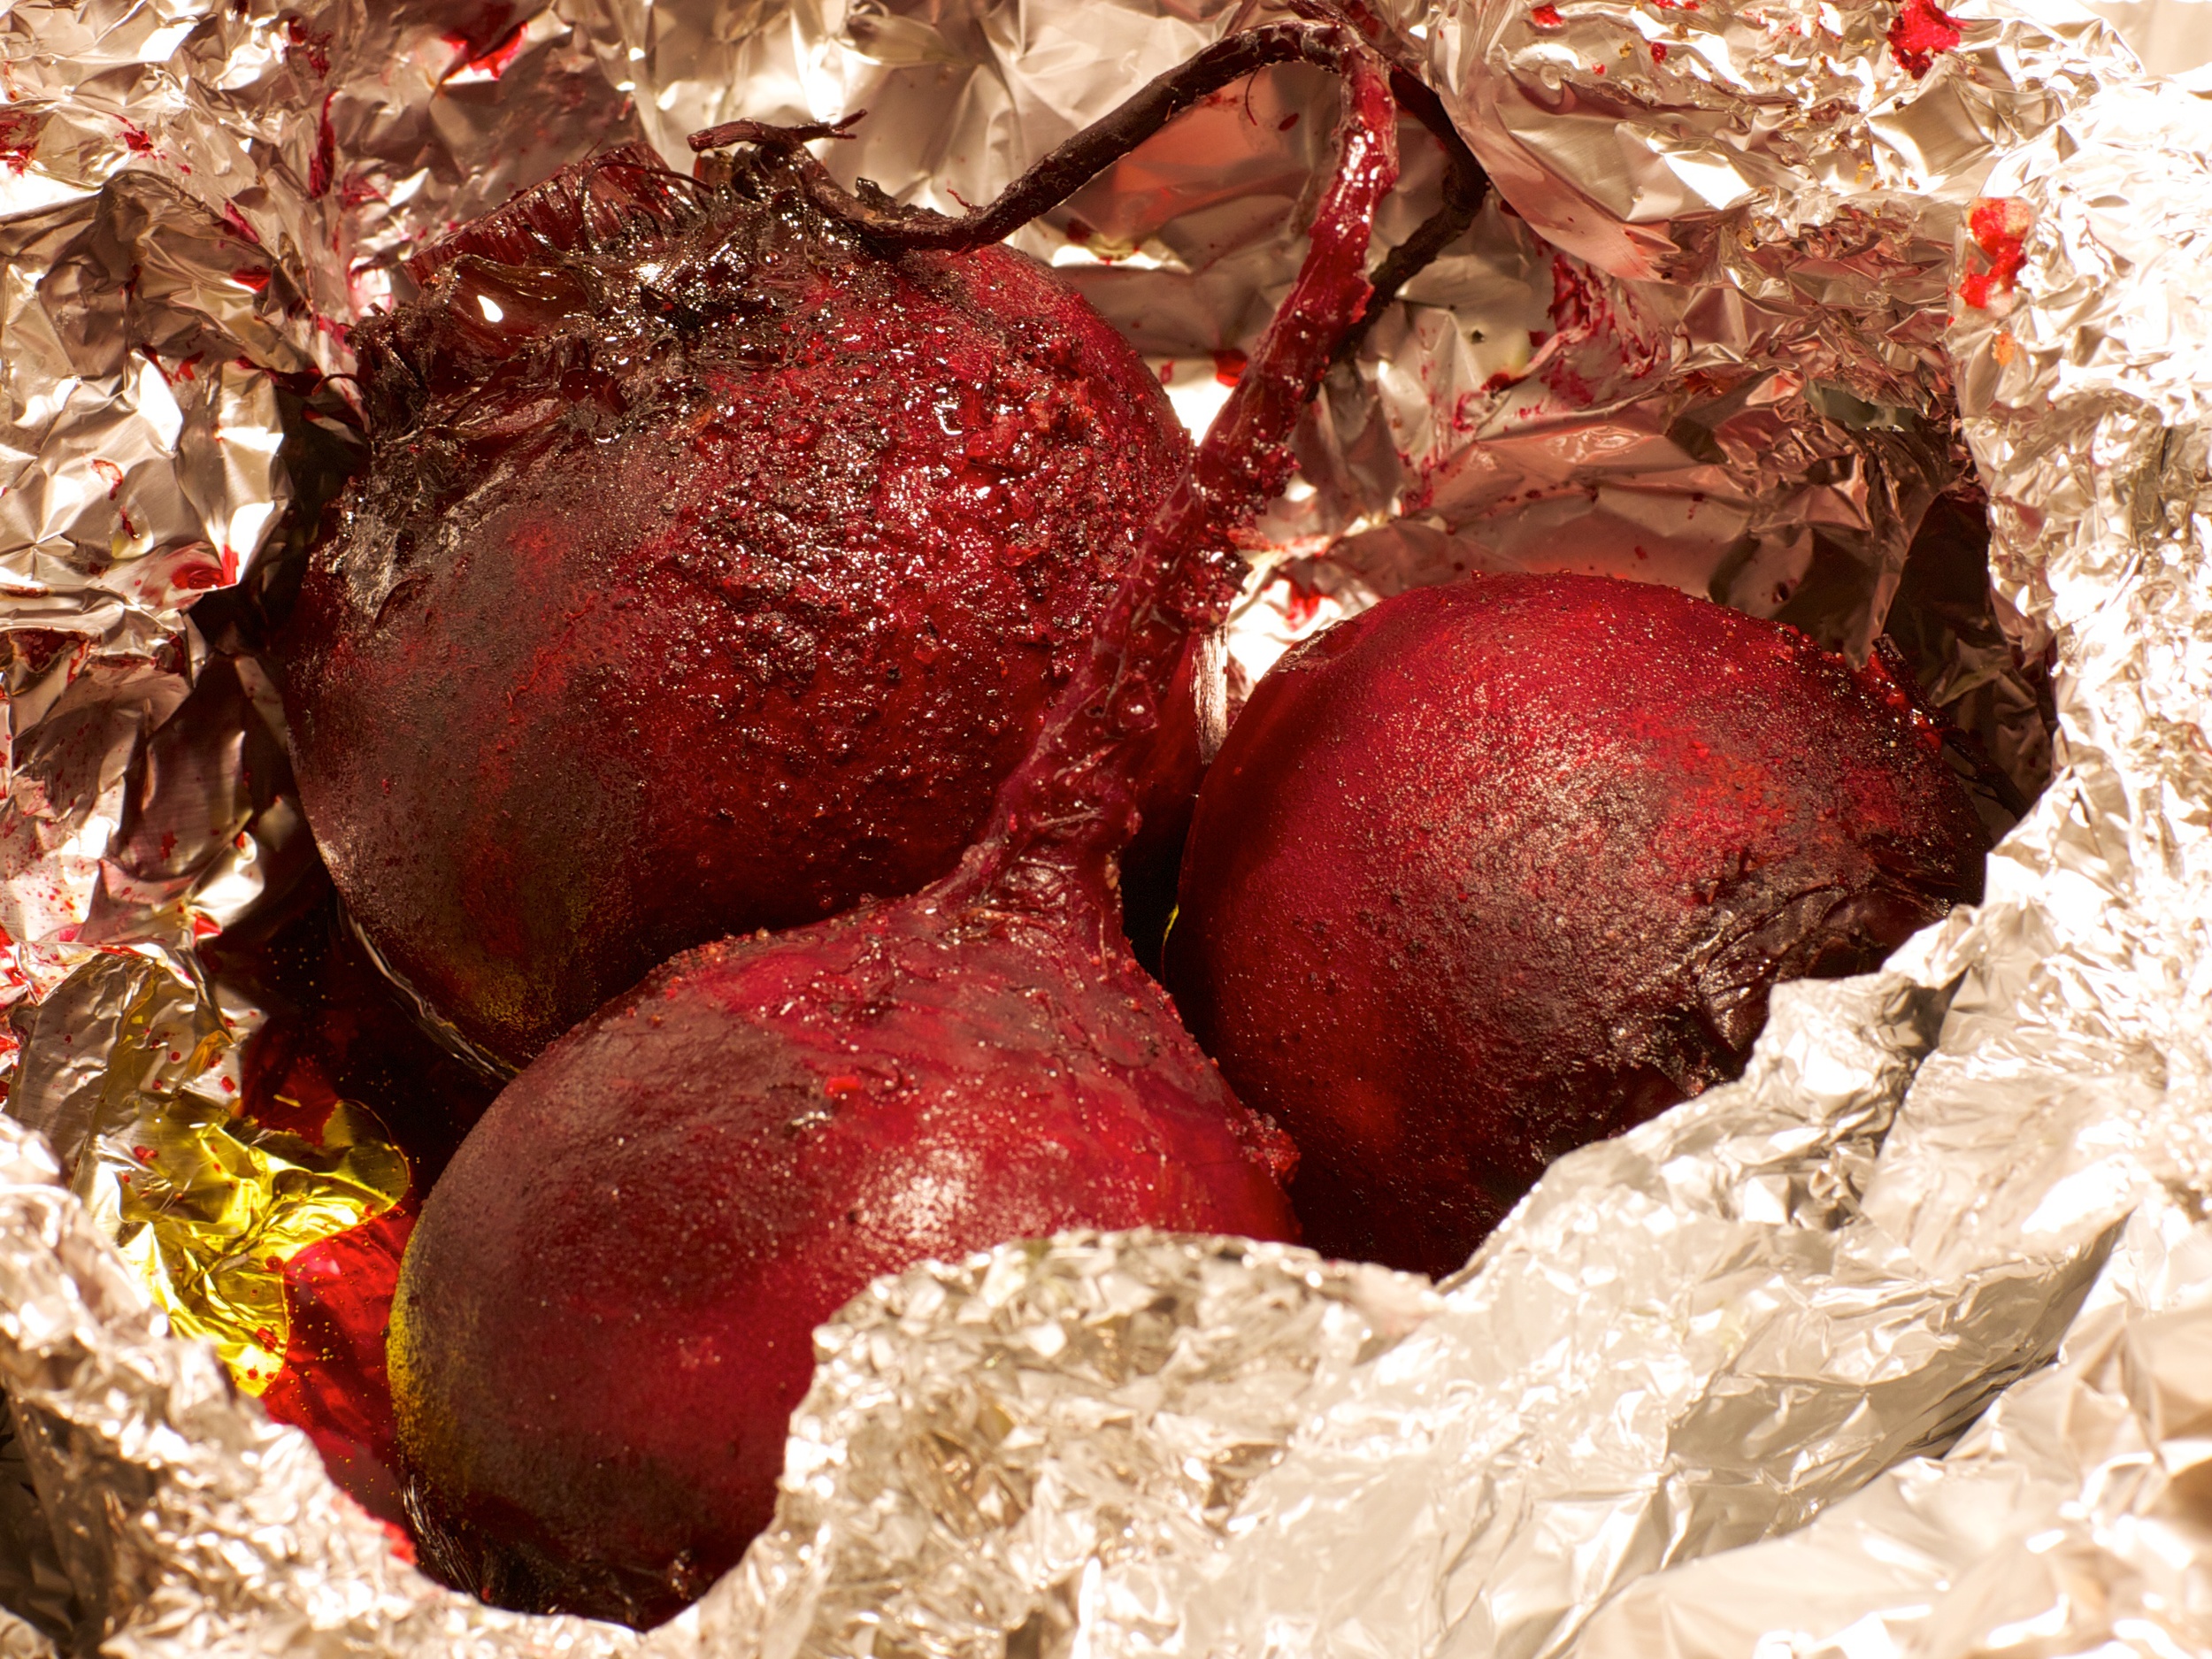
 

Baked beats

Baked beats

Wash the beets and trim the stems, leaving about1/4 inch attached. Place them on a large piece of aluminum foil and toss with the oil, water, salt and pepper.

Lift up the edges of the foil and squeeze together to form a packet. Place in a small baking pan and roast for about 1,5 hours, or until the beets are tender, offering no resistance  when pierced with a knife. Carefully unwrap the beets and let stand just until cool enough to handle.

Roast the hazelnuts in the oven until they get golden.


Mix up the dressing. 

Rub each beet with a paper towel to remove the skin. Cut of and discard the stems. Cut the beets into quarters, then cut the quarters crosswise into 1/4 inch slices and place in a bowl. Add half of the dressing, and season with salt and pepper. Let marinate for at least 30 minutes or up to a day in the refrigerator. Bring to room temperature before finishing the salad.

Toss the salad with the rest of the dressing.

Place the salad on a plate, arrange the beets, goat cheese and clementine slices around the salad.


The Danish version:


Ingredienser: 

Ovnbagte rødbeder:: 

  • 3 Rødbeder (på str med tennisbolde)

  • 2 spsk olivenolie

  • 2 spsk vand

  • 1/2 tsk salt

  • 1/4 tsk peber

Rødbedesalat: 

  • 100 g blandet salat

  • 1 håndfuld hasselnødder

  • 113 g gedeost

  • 1-2 clementiner

Dressing: 

  • 1 spsk oliven olie

  • 1/2 tsk hvidvinseddike

  • 2-3 spsk frisk appelsinsaft

  • salt & peber.

Forvarm oven til  190°C.

Vask rødbederne grundigt, og skær stilkene helt ned til rødbeden. Læg rødbederne på et story stykke staniol. Form en lille skål med staniolen og tilsæt vand, olie, salt og peber. Luk staniolen så du får en lille pakke, så dampen bliver inden i. Sæt pakken i ovnen, og bag rødbederne i ca 1,5 time, eller til de er møre. Tag pakken ud af oven og åben pakken, og lad rødbederne køle indtil de er tip at håndtere. 

Rist hasselnødderne i en bradepande i ovnen indtil de er gyldne.

Lav dressingen, ved at piske alle ingredienserne sammen. 

Mix up the dressing. 

Gnid rødbederne med køkkenrulle for at fjerne skralden. Skær top og roden af. Skær rødbederne i mundrette stykker. Kom rødbederne i en skål og hæld halvdelen af dressingen over og smag til med salt og peber. Lad rødbederne marinere i køleslabet i mindst 30 minutter, eller op til en dag i køleskabet. Rødbederne bør have stuetemperatur inden salaten samles.

Bland dressingen i den blandede salat, og anret den å tallerkener eller et fad. Arranger rødbeder, gedeoste,  clementinskiverne og hasselnødderne ovenpå salaten.


Pickled beets - syltede rødbeder

Sides, VegetablesComment
Pickled Beets

Pickled Beets

Pickled beets is one of the most common toppings for an open faced sandwich with liver pate. In my home we had them with meatballs or medisterpølse at dinner. 

My parents grew beets in their large vegetables garden. My mom made a large batch of pickled beets enough for the whole year. My moms pickled beets were the best, they were worth the work for sure. 

When I lived in Denmark, I didn't pickle my own beets, I just bought them at the store. But moving here I wanted to have the taste of the childhood pickled beets. This is how I do.


Ingredients

Beets.

Beets.

  • 1 kg beets, scrubbed clean, but not peeled
  • salt (1 tablespoon pr liter water)

Pickling liquid:

  • 1 liter vinegar
  • 450 g sugar
  • 8 whole cloves
  • 2-3 slices horseradish  

Direction: 

Wash the beets and trim the stems, leaving about 1/4 inch attached. Don't cut into the beets, they will lose a lot of the juices.  

Bring the water to a boil in a large pot. Add salt and the beets and cook until just tender, about 45-60 minutes depending on the size of the beets. 

Drain the beets and rinse with cold water and let the beets cool in the cold warter.

Bring vinegar to a boil and add sugar and cloves. Cut of the top and bottom of the beets, and rub the skin of, in a paper towel. Slice the beets to the desired thickness, fill the jars with the sliced beets, and pour in vinegar to cover the beets. Add 1-2 slices horseradish and close lids and allow to cool completely.

The pickled beets are ready to eat after at least 2 weeks, but they will keep for months unopened. 

You can add a preservative like Atamon  (sodium benzoate) to increase the shelf life. 


Danish Rye Bread

Bread8 Comments
Danish Rye Bread

Danish Rye Bread

Open-faced sandwich with roast beef 

Open-faced sandwich with roast beef 

Growing up in Denmark we had open-faced sandwiches for lunch every day. Like this Roast beef with horseradish, remoulade and pickles cucumber. OK this was not an everyday dish. Normally the sandwich was more simple, like liver pate with pickled beets or egg with mayo. 

Moving outside Scandinavia I was forced to figure out how I could get the Rye bread (Rugbrød).  

The easy way out was going to IKEA to get their Shake 'n Bake Rye Bread, and this was the route I went for the first years. 

Baking the Tartine Bread gave me an introduction to baking with sourdough, and it was a segway into baking Rye Bread from scratch.

I didn't want to make the same bread as my mom made back in the days. It was way too white, and looked more like a wheat bread than a rye bread. 

My inspiration came from Kvalimads Best Rye Bread.  I made some changes to his recipes. This is how I make the bread:

Sourdough starter: 

Allmost all bakers of the danish rye bread has their own sourdough starter. Many people get the starter from a friend or relative. A starter can last for decades if treated right.

I opted for the easy way out, buying a starter from King Arthur Flour, and fed it with half rye and wheat flour. By now my starter is a year old, and some of my friends got some of it. It takes a couple of bakes to get the right acidity and taste if you start your own starter from scratch.


This recipe makes 2 big rye bread. 


Sourdough leaven: 

  • 200 g sourdough/starter (the starter you keep in the refrigerator and feed every other week) 
  • 400 g water
  • 125 g rye flour
  • 135 g all-purpose flour

Dough:

  • 1600 g water
  • 600 g sourdough leaven
  • 265 g rye berries (hele rugkerner)
  • 150 g cracked rye (knækkede rygkerner)
  • 75 g flax seeds
  • 75 g sunflower seeds
  • 275 g wheat berries (hard red spring wheat berries) (hele hvedekerner)
  • 170 g bulgur (100% whole grain quick cooking bulgur wheat)
  • 375 g rye flour (dark rye flour)
  • 400 g all-purpose flour
  • 3 tablespoon (57 g) salt
  • a splash coloring/kulør - optional
  • Topping pumpin seeds, 

Directions:

    Day 1, morning: 

    The process 

    The process 

    Feed the starter to make the leaven. The leaven is ready to use when the leaven is bubbleing and smells like beer - after about 8 hours at room temperature. Cover the leaven with a clean towel. 

    Soak the rye- and wheat-berries and seed in water in a large bow (I use to bowl because of the big amount). Cover the bowl with a large plate. Let them soak at room temperature until the leaven is ready.

    Day 1,

    night: 

    Save about 200g leaven and put it aside in a sealed container. This will be your sourdough starter for the next batch of bread. It will keep without feeding for about 14 days in the refrigerator. 

    Add the leaven to the soaked berries and seed. Cover the bowl with a large plate. Let the mixture ferment overnight at room temperature . 


    Day 2, morning: 

    Add the salt, coloring and the flour to the dough and mix thoroughly, to make sure all the flour is fully incorporated, let rise for about two hours.

    Eva Professionel rye bread tin

    Eva Professionel rye bread tin

    Add the dough to two rye bread baking forms. (I use Eva Professionel Rye Bread Tin which holds 3,3 liters).

    Let the bread rise for about an hour, covered with a clean towel. The longer you let it rise, the more sour the bread becomes.

    Poke a few holes with a cake tester or knitting needle, to  prevent the crust to rise and crack.

    Brush the bread with water and sprinkle with pumpkin or sesame seeds.

    Place the baking form in a preheated oven for 1 hour 15 minutes at 350°F. 

    Turn off the heat, remove the breads from the baking forms, spray with water on all sides and place them back in the oven directly on the rack for about an hour while the oven cools.

    Take the breads out and wrap them in an clean kitchen towel. This will help softening the crust. Let breads cool completely.

    It's best to wait cutting the bread until the next day. 

    Enjoy the bread with your favorite deli meat or cheese. 


    Testing the leaven the man in the cup showed up. 

    The man in the cup

    The man in the cup


    Danish cucumber salad

    Sides5 Comments
    Danish Cucumber Salad

    Danish Cucumber Salad

    Danish cucumber salad is a quick and easy pickled sliced cucumber. You can make it just before you serve it, but it gets better if you let it sit for at least 30 minutes. It's sweet, crunchy and tart. It's perfect side for sandwiches or to traditional danish meat dishes.  

    My mom always made cucumber salad, when we had a pot roasted whole chicken for dinner. But it's also good on hotdogs you get at the danish hotdog stands.

    You can make cucumber salad with or without adding onions. I make it without because this is how my mom made it. I use english cucumber for this salad, because it's the danish way. The english cucumber has a thin crisp skin and small seeds. If you use another kind of cucumber, peel it before slicing. 

    Ingredients: 

    • 1 english cucumber
    • 1 cup of warm water
    • 1 cup of distilled white vinegar.
    • 5-6 tablespoons sugar
    • salt and pepper, to taste

    Directions:

    Mix the vinegar, water, sugar, salt and pepper in a bowl. Keep mixing until the sugar is dissolved. Slice cucumber very thin slices on a mandolin. Squeeze the excess water out of the cucumbers slices and put them into the vinegar. Place a plate over the cucumbers and sit something heavy on top of the plate, to submerge all the cucumber slices in the vinegar. 

    Place in refrigerator for at least 30 minutes to marinade before serving. Can be stored in the refrigerator for up to 1 week.

    Enjoy!


    The Danish version: 

    Agurksalat

    Ingredienser:

    • 1 agurk
    • 1 dl varm vand 
    • 1 dl eddike
    • 5-6 spsk sukker
    • salt & peber


    Bland eddike, vand, sukker, salt og peber i en skål. Rør indtil sukkeret er helt opløst. Skær agurken meget tynde skiver på et mandolinjern. Pres overskydende vand ud af agurkeskiverne og kom dem ned i eddiken. Placer en tallerken ovenpå agurkerne og sæt noget tungt oven på tallerkenen for at holde agurkeskiverne dækket  af eddikre.

    Lad salaten trække i mindst 30 minutter før servering. Kan opbevares i køleskabet i op til 1 uge.


    Greek-style Lamb Meatballs - Græske Lammefrikadelle

    Lamb, Dinner4 Comments
    Greek-style Lamb Meatballs

    Greek-style Lamb Meatballs

    Everybody knows Swedish meatballs from IKEA. They have a danish cousin, they are not round but more flat and fried on a skillet in butter.

    Growing up with moms meatballs, hard on the outside and soft on the inside, not my cup of tea. The taste was good, but texture-vise I needed something else. My moms meatballs was made with all-purpose flours as the starch component. But one of my friends said to try using rolled oats instead, and it made a big difference.

    My old aunt from Jutland also taught me some of her secrets to good meatballs. You start by mixing the meat with salt, this makes some of the meat proteins water soluble, which acts like a emulsifier. She always tasted the meat to see if it needed more salt, I wouldn't recommend this. Try to fry up a small meatball to taste it. 

    Divide the meat in quarters, lift one quarter up unto the other quarters. Fill the missing quarter with rolled oats. Put in finely chopped or grated onions, the eggs, milk salt and pepper and mix until you have a cohesive meat mixture. I use the same directions for these lamb meatballs

    I like to experiment with the classic recipes, and wanted to try out a greek take on the danish meatballs. What makes these greek?  Making them with lamb and adding garlic, feta, olives, roasted tomatoes and rosemary gave them a greek twist. 

    My husband loves these especially when I serve them with tzatziki and orzo salad.

    Makes 30 meatballs

    Ingredients: 

    The Ingredients.

    The Ingredients.

    • 1 kg (2 lb.) ground lamb meat

    • rolled oats

    • 2 eggs

    • 2 medium onions

    • ⅓ cup milk

    • ¼ cup roasted garlic

    • 2 garlic cloves (fresh)

    • ¼ cup pitted kalamata olives

    • 75 g feta cheese

    • ¼ cup roasted tomatoes

    • 2 sprigs rosemary

    • 1½ teaspoons salt

    • pepper

    • Butter and oil for frying


    Directions:

    The Process.

    The Process.

    Mix the meat with salt.  Divide the meat in quarters, lift one quarter up unto the other quarters. Fill the missing quarter with rolled oats. Put in finely chopped or grated onions, the eggs, milk,  salt and pepper and mix until you have a cohesive meat mixture. Add the chopped rosted garlic, fresh garlic, olives, feta cheese roasted tomatoes and rosemary. 

    Place a skillet over medium-high heat. Melt a couple of table spoons of butter in the skillet

    Forming the meatballs dip a tablespoon in the melted butter and scoop up a good spoonful meat. Use the hand and the spoon to form the meatball.  The meatball should be oval an the size of a small egg. Placed the meatball in the skillet, repeat until you have a full skillet. Be careful not to let the meatballs touch each other.

    Fry the meatball for about 3 to 5 minutes on each side, until they are well-browned and no longer pink in the center. Depending how big the meatballs are and how hot your pan is the time may vary.  When done remove the meatballs onto a plate, and set aside.

    If you have a more meat mixture in the bowl, clean the skillet with a kitchen towel and add new butter and fry another batch.


    The Danish Version


    Græske lammefrikadeller


    Ingredienser: 

    • 1 kg hakket lammekød

    • havregryn

    • 2 æg

    • 2 løg

    • 3/4 dl mælk

    • en lille håndfuld ristede hvidløgsfed

    • 2 hvidløsfed (friske)

    • en lille håndfuld kalamata oliven

    • 75 g feta

    • en lille håndfuld semi dried tomater

    • 2 kviste rosemarin

    • 1,5 tsk salt

    • pepper

    • smør og olie til stegningen


    Bland kødet med salt. Del kødet i kvarte, løft en fjerdedel op op de andre. Fyld den manglende fjerdedel med havregryn. Tilsæt  finthakket eller revet løg, æg, mælk, salt og peber og bland indtil du har en sammenhængende fars. Tilsæt den hakkede ristede hvidløg, frisk hvidløg, oliven, feta, ristede tomater og rosmarin, bland det godt.

    Smelt et par spiseskefulde smør på en stegepande, tilsæt lidt oile.

    Brug hånden og skeen til at forme frikadellerne . Frikadellerne skal være ovale, på størrelse med en lille æg . Steg frikadellerne i omkring 3 til 5 minutter på hver side, indtil de er godt brunet og ikke længere rå inden i. Stegetiden varierer afhængig af størrelsen på frikadellerne, og hvor varmt din stegepande er.