Baking:
Weight versus Volume Measurements:
When you start baking, you will be told, that baking is an exact science, - and it is so true!
Baking is based on specific ratios between ingredients, and using imperial/volume measurements these ratios becomes very imprecise.
If I weigh 1 cup of flour, I will likely not end up with the same amount as you would, if you weigh 1 cup of your flour. This difference, plus the difference in water contents in the flour, will give visual and textural differences in the final product.
When baking with pre-ferments or leavens (sourdough), the aspect of weight versus volume measurements becomes more evident. Because the pre-ferment/leaven is filled with a lot of gas/air, it will deflate/degas, when handled.
This is why a scale is one of the best investments you can make for baking to avoid failure.
Tips & Tricks:
Potaske is Potassium carbonate (K₂CO₃). You can replace potaske with Baking Soda, but the cookies won't be as crispy.
Natron is Baking Soda.
Hjortetaksalt is Ammonium bicarbonate (NH₄HCO₃). You can get it here
Yeast:
1 pack of danish live yeast (fresh compressed yeast) is 50 g, equivalent to 1 pack of Danish dry yeast, 11.8 g.
1 pack of Danish dry yeast is 11.8 g, which is equivalent to 4 teaspoons dry yeast.
1 pack of fleischmann's dry yeast contains 7 g.
I buy my fresh compressed yeast from at Copenhagen Bakery in Burlingame or online at The New York Bakers
Butter:
½ cup butter = 1 stick = 113.4 g
Baking Bread
Basically bread is a combination of 4 simple ingredients: water, flour, salt, and yeast/leaven agent. It’s quite impressive that these 4 ingredients can make som many different breads, even when using the same flour.
To get a fermentation started to make bread you need a leavening agent like yeast, some kind of preferment, or both. Typically a preferment is a “pre-dough”made with yeast or sourdough starter, in advance. The preferment help building more complex flavors to the bread. But it also gives a different structure to the bread.
Leaving Agents
Yeast makes it possible to bake a decent bread in a short amount of time. But you get speed on the expense of flavor and texture. Baking with a preferment alone, you slow down the process, but you gain a lot on the flavor front. By using both yeast and a preferment, you get the best og two worlds. You get a more complex flavor and texture, while being helped and speeded up by using yeast, compared to a yeast only bread. It is possible to get semi-complete flavors in a yeast only bread, by doing a cold fermentation over 12-18 hours.
Not all yeast are the same, nor can they replace each other in equal amount.
Fresh Yeast - comes in blocks and is partially hydrated. It has to be refrigerated, and have a relative short shelf-life. This is the kind I was used to from back home, but can be hard to come by here in the US. I get my fresh yeast from The New York Bakes, they ship nationwide. http://nybakers.com/index.php?main_page=product_info&cPath=6&products_id=53
Active dry yeast - is commonly available in most grocery store in the US. You need to activate the yeast in warm water before mixing the dough. The proofing time takes longer than the other yeasts.
Instant yeast - is also commonly available in most grocery store in the US. This yeast can be added in the dry ingredients, but nevertheless I still activate the yeast in warm water(liquid). Old habitats die hard.
Preferment can be:
Sourdough/leaven: Sourdough is one of the oldest leaving agents.
Poolish and Biga are both preferments, but a poolish is normally from equal amounts of water and flour, with a small amount of bakers yeast. While a Biga normally have a lower hydration, meaning being firmer in texture.
Bakers Percentage (%)
Bakers percentages are when all ingredients are stated as a percentage of the amount of flour used.

Bakers %
The amount of flour (all kinds of flour if using more than one) will always be 100%
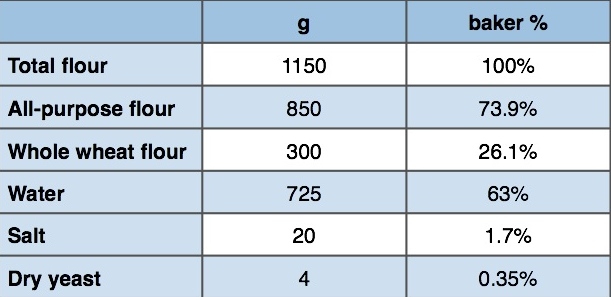
Bakers %
You can be baking perfectly good breads without giving any thoughts to the bakers percentage or even trying to calculate it. But when comparing recipes the percentages of water in a dough, might give you an idea how the dough will handle.
Hydration: Hydration is one reason professional and semi-professional bakers uses bakers procentage. The hydration is the amount of water in the dough in relation to the amount of flour. Changing the hydration of the bread, changes the texture of the bread.
High hydration : 80%-100%
Low hydration: ~ 60%
Autolyse:
Autolyse is another expression bakers use. Basically it means that you mix the flour with water, and let it sit for about 20-30 minutes. This lets the flour absorb all the water completely, and helps activate the natural enzymes in the flour, and improves the gluten development in the dough.
Mixing
For the most part the mixing of the ingredients will take place in a bowl. No matter which leaving agent you use, you have to think about when and where to add the salt. Salt inhibits or kill the yeast.
Flavor:
Most breads are just flour, water, salt and yeast/sourdough. So why are some breads full of flavor and texture, while other are not?
I have learned that it takes time to bake a good bread. The times the dough a chance to develop flavors from the leaven and bacteria, including, alcohol, acids and esters (chemical compounds that is a part of the aromas and flavors produced).
Flavor builders:
Generally there are three parameters you can change in a bread recipe to increase/decrease flavors.
Yeast or leaven
Time
Temperature
Yeast/leaven:
By increasing, or decreasing, the amount of yeast, or leaven, to the dough, you can limit or extend the time before there is enough yeast cells to produce gas and the dough will start to rise.
Time:
A longer fermentation gives more flavor in the bread, but a too long fermentation will yield a very tangy and strong alcohol taste, which will overpower the sweetness of the wheat.
Another drawback of overextended fermentation is the breakdown of the gluten structure, which will make the dough collapse.
Temperature:
A higher temperature will make the fermentation go faster, lowering it will make it slow down. But what are the benefits of either?
Normally I’ll ferment my dough at room temperature, 68-72℉ or 20-22℃. It works great for me. I have not yet tried to ferment at lower temperatures, because I do not have a roomy refrigerator or other professional equipment. But I think my room temperature is lower than most peoples, probably due to my viking genes.
Sometimes you can make temperature work to your advantage. I often make my Basic Country Bread a la Tartine, so I’ll start ferment it in the evening, and by the time I make the final shaping, it is time for proofing and close to bedtime. So I put my proofing baskets in big ziplock bags and put them into the refrigerator. This makes it possible for me to bake the bread first thing in the morning, instead of puling an all-nighter.
Generally speaking a long ferment will yield a bread with a more complex taste. But because dough is a living organism, it has it's limitations. Going to the limits with time and temperature can give you a great or a very bad bread, depending on what you do.
Dough Building
Kneading:
Building up the gluten network.
Folding and bulk fermentation:
Building up volume/bulk.
This technique is often used in doughs with a high hydration (moist Doughs). I use the folding technique from the basic country bread a la Tartine during the fermentation of my sourdough breads like xxxx and xxxx. Instead of kneading the dough, I stretch and fold the dough, which helps build up the gluten network and aerate the dough.
To do a fold: Dip one hand in water to prevent sticking. Grab the underside of the dough, stretch it out, and fold it back over itself. Rotate container one-quarter turn, and repeat. Do this 2 or 3 times for each fold. After the first fold, let the dough rest covered for 30 minutes. After about 3-4 hours, the dough should feel aerated and softer, and you will see a 20 to 30 percent increase in volume. If not, continue bulk fermentation for 30 minutes to 1 hour more.
Preshape:
After the bulk fermentation you pre shape the bread.
Gently pull the dough out of container using a dough spatula onto an unfloured surface. Lightly flour the top of the dough and use a bench knife to flip it over, so the floured side now rest on the work surface.
While working with the dough you want to incorporate as little flour as possible. Work each piece into a round using scraper and one hand. Tension will build as the dough slightly anchors to the surface as you rotate it. By the end, the dough should have a taut, smooth surface. Dust tops of rounds with flour, cover with a tea towel, and let rest on the work surface for 20 to 30 minutes for the bench rest. The bench rest will allow the dough to relax into its new shape.
The edges should appear fat and rounded, not flat or "dripping" off the edge. If the dough is flat or the dough is spreading too much, the dough has not developed a strong enough gluten network during the bulk fermentation. To correct this, shape the dough into a round for a second time and let it sit to rest covered once more.
Final shape
……
Oven Spring:
Oven spring is the final rising of the dough, just after the loaf is put in the oven, and before the crust has hardened. To get the maximum oven spring you need to delay the hardening of the crust, to get the loaf to expand. By keeping the surface moist with some kind of steam, you can delay the coagulation of the protein (gluten) in the crust.
Scoring the bread helps you to control where the bread will spilt open due to the oven spring. If bread is not scored, it will split open slightly at the sides, just under the crown if baked in a loaf pan or toward the bottom if free-form.
I use a lame knife, it’s basically a razor blade on a stick. The scoring should be ¼ - ½ inch deep.
Baking:
Baking with Steam:
There are many ways to try to get steam in your oven. Here is a few methods.
Put a baking pan on the bottom rack and fill it with pebbles or a large stainless steel chain, and preheat the oven with this in the oven. When you put your bread or rolls into the oven, splash ½ cup hot water on the rocks/chain and close the door quickly. This will build up enough steam to help with the oven-spring/the rise of the dough, before the crust hardens in the heat.
Place 2-3 soaking wet kitchen towels on a baking pan on the bottom rack, while preheating the oven, and for the first 5-8 minutes of the baking time, and then remove the pan with the towels. Be careful opening the oven the steam will burn you, so stay clear of the oven-opening.
The simplest way is to spray some hot water into the oven, but this might not be enough to give a perfect oven-spring.
Baking in a Dutch oven or pot: The moisture released from the dough is trapped inside the vessel and will provide a similar environment as a steam oven. It will slow down the setting of the crust, making a good oven spring possible.
Why use Steam?
By adding steam to the oven during the start of the baking process (the first 5-10 minutes), you'll keep the crust soft, allowing the bread to expand, getting the oven spring. Another thing the steam is a greater conductor of heat, so the steam will allow the temperature in and on the dough to rise faster than without steam. This rapid heating will give the bread a thicker crust and a deeper flavoring, due to the Maillard compounds formed at the high temperature.
Cake Baking:
Generally you have 3 kinds of batters/doughs when you talk cakes.
Whipped Batter:
A whipped batter is used for spongecakes (lagkagebunde). Whipped batters starts with whisking eggs with sugar light and foamy, then folding in the dry ingredients. Normally you don't add butter or oil to a whipped batter, but off course, no rules without exceptions.
Creamed Batter:
Creamed batters are used in poundcakes (sandkager). They start with creaming butter with sugar, then adding eggs one at a time. A creamed batter will make a denser cake than the whipped batter. The creamed batter is the traditional method here in the US.
The creamed batter has a distant cousin, the Crumble Cake. The crumble cake starts by cutting or massaging the butter into the flour until it resembles wet sand, then adding the rest of the ingredients. This technique prevents the gluten structure from forming, and this makes for thinner more crumbly cakes. You'll use this technique in pie crusts and crispy Scandinavian cookies.
Yeast Based Cakes:
Yeast based cakes are borderline breads. Technically they are not cakes as we come to know them nowadays. But the first cakes know where yeast based, or they were sweet breads. Some of the best known yeast based cakes are pastries like Danish, croissants, or wienerbrød as they are called in Denmark. But also something like cinnamon rolls, are yeast based breads.
A yeast based cake, needs kneading and time to rise, where the other 2 kinds of cakes are more like mix & bake kinda cakes.
Pastry/wienerbrød
The Danish pastry is a laminated yeast dough much like the French croissant. There are many ways to make this lamination. The amount of layers are different from country to country and from baker to baker. You get the flaky layers by folding sheets of dough with butter.
One of the more important things in puff pastry is the butter. You want to use a european style butter. The European butter contains less liquid and more milk fats than American butter. Most people opt for unsalted butter, but I always use salted butter in my baking.
There are different kinds of folding/turning when it comes to pastry and croissant dough:
Letter fold or Single turn: Dough folded in thirds, like you would do a letter going into an envelope. (I did that for this recipe.)
1. Turn: makes 3 layers of butter
2. Turn: makes 9 layers of butter
3. Turn: makes 27 layers of butter.
Book fold or double turn: Dough folded to the middle and folded again on the middle like a book. This makes 4 layers per fold or turn as they are called.
1. Turn: makes 4 layers of butter
2. Turn: makes 16 layers of butter
3. Turn: makes 64 layers of butter
Some people claim that any more layers than 3 turns using a letter fold, will make the dough like a brioche instead of providing the flaky layers. The 3 turns makes 27 layers. You can mix the folding methods to get the amount of layer you want.
At the croissant class I attended I learned that Manresa Bread use 2 double turns ((16 layers) for regular croissants, and 3 single turns (27 layers) for chocolate croissants. For traditional Danish pastry you normally use 3 single turns, giving the desired 27 layers of butter.