Sweet • Sour • Savory

Sweet • Sour • Savory

Food blog on scandinavian style food done right.

Beef Stroganoff with Celery Root Mash

Beef, Dinner, Meats, Simmer Food2 Comments
Beef Stroganoff with Celery Root Mash

Beef Stroganoff with Celery Root Mash

Beef stroganoff was a fall favorite in my childhood. My mom loved to make simmer food, especially when entertaining guests. She could get the dinner started, clean up and get ready for the guests to arrive, instead of sweating over the pots and pans, when the guests arrived. I totally get her. I believe this is the way to go, when you're having guests over. 

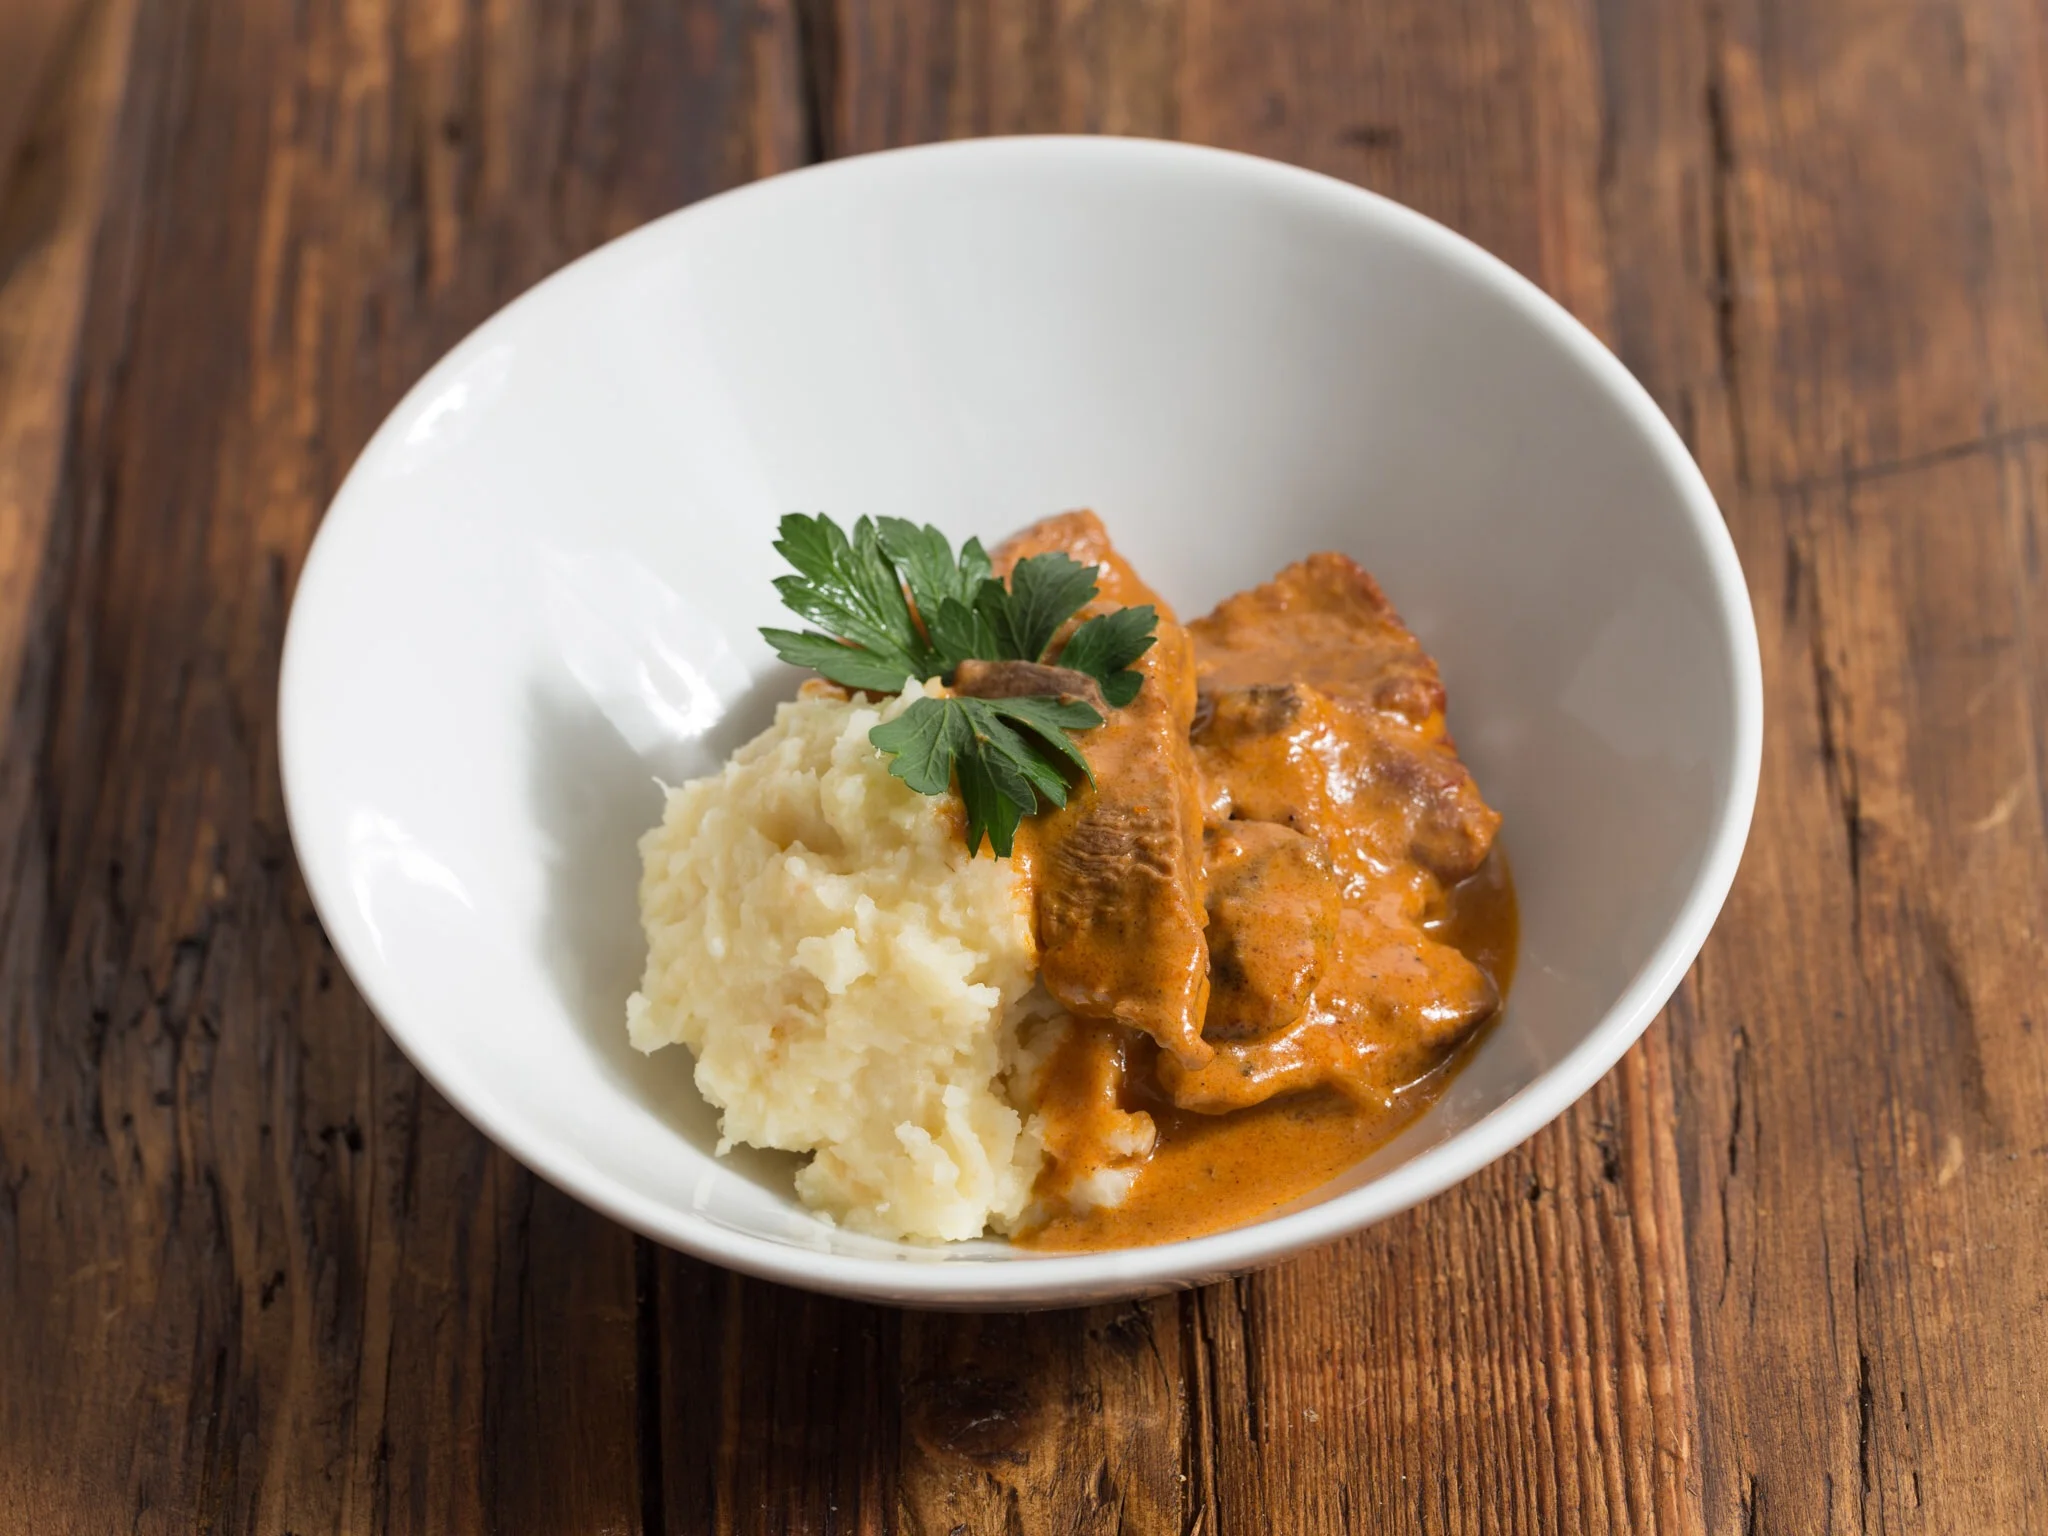
Normally stroganoff is served with pasta, but in my family we have always had mashed potatoes. Today I opted for at lighter version with the celery root mash

Serves 4

Ingredients:

Stroganoff:

  • 10 slices bacon (10 thin slices or 5 thick cut), diced

  • 2 pounds Beef stew meat

  • 2 tablespoons paprika

  • 1 tablespoon hot paprika (or regular paprika if you don't like the spiciness)

  • 1½ teaspoon smoked paprika

  • 3 onions (medium or 4 small), diced

  • 2 tablespoons salted butter

  • 1 tablespoon olive oil

  • 400 g button mushrooms, sliced

  • 3 tablespoons tomato paste

  • 1 teaspoon beef base

  • 200 ml water

  • 200 g creme fraiche

  • ½ cup (1 dl) whipping cream

  • salt & pepper

Mash:

  • 2 celery root

  • 4 medium potatoes

  • 2- 3 tablespoons butter

  • ¼ cup (½ dl) hot milk

  • salt to taste

Directions:

Stroganoff:

Place bacon in a large pot or Dutch oven and heat over medium heat. Cook bacon until crispy and fat has rendered, about 8 to 10 minutes. Transfer bacon to a paper towel-lined plate, leaving some of the fat in the Dutch oven. 

Sauté onion and mushrooms in some of the rendered bacon fat, until golden brown. Remove from Dutch oven, and set aside. 

Put some all-purpose flour in a ziploc bag, add paprika, some salt and pepper. Pad dry the meat, and place them in the ziploc bag, cover the meat with the spicy flour.

Heat the butter in the Dutch oven and sear the meat in batches so you get a good sear on the meat, and set aside. Wipe the pot clean with a paper towel. 

Heat the olive oil to the pot, add the tomato paste and cook until tomato paste turns a deeper red, about 1 to 2 minutes. Add  meat, onions, mushrooms, bacon, beef base and water. (Beef stock can be used instead of water and beef base.)  Cook the dish for 2-3 hours on a low simmer. Add creme fraiche and cream, and let simmer for another 30 minutes.

Mash:

Peel and dice the potatoes and celery roots. Put them in a large pot with enough water to cover them. Add about 1 teaspoon salt. Boil them for about 25-30 minutes, until soft. 

Drain celery roots and potatoes well, return them to the pot, and let the remaining water evaporate for a minute or two before returning the vegetables to the pot. Add butter and mash with a potato masher until smooth. Add the milk and season with salt. I whipped the mash to get it more creamy, but that is optional. 


Serve Stroganoff over pasta or over hearty mash.

Enjoy!

Florentines with Vanilla Buttercream

Cake, Cookies, DessertsComment
Florentines with Vanilla Buttercream

Florentines with Vanilla Buttercream

Dansk udgave

This crispy caramel and nut cookie is a classic in most of Europe. They are really tasty and fairly sweet.

They are really easy to make, and you don’t have to be a baker to make them. The most difficult will be making the buttercream. The cookies will look really fancy, with little to no work. You can use most kind of nuts, and even add some candied cherries if you like.

Makes 9 

Ingredients:

Nuts:

  • 50 g sliced almonds

  • 50 g chopped hazelnuts

  • 25 g pistachios

Caramel:

  • 100 g butter, salted

  • 100 g sugar

  • 1 tablespoon all-purpose flour

  • 2 tablespoons whipping cream

  • 1 tablespoon thick syrup

Vanilla buttercream:

  • 2 tablespoons pasteurized egg whites

  • 100 g confectionary sugar

  • 150 g butter, salted and room temperature

  • ½ teaspoon vanilla paste

Directions:

Preheat the oven for 350℉ (175℃).

Mix the ingredients for the caramel in a small saucepan. Gently heat the mixture until the butter and sugar are melted. Mix in the nuts, and remove from heat.

Scoop about a teaspoon of the mixture into 2 nonstick muffin pans. 

Bake the cookies for about 10-12 minutes until golden brown. Let the cookies cool for about 10 minutes in the pan. Gently remove the cookies from the pan. I used a knife to get them out. Let the cookies cool completely.

Buttercream:

Mix all the ingredients in a bowl, and whip the buttercream until thick and fluffy over a double boiler. I used a saucepan with very hot water, and placed my bowl on top of that. I didn't have it on the stove. It takes some time to get the buttercream nice and fluffy.

Pipe the buttercream on the bottom of half the cookies, top with the rest of the cookie, bottom side down, pressing lightly to adhere.

Serve with a nice cup of tea or coffee.

Enjoy!


The Danish version:

Florentinere

Ingredienser:

Nødder:

  • 50 g mandelflager

  • 50 g hasselnøddeflager

  • 25 g hakkede rå pistacienødder

Karamel:

  • 100 g saltet smør

  • 100 g sukker

  • 1 spsk hvedemel

  • 2 spsk fløde

  • 1 spsk mørk sirup

Vanillesmørcreme:

  • 2 spsk pasteuriserede æggehvider

  • 100 g flormelis

  • 150 g smør, saltet og stuetemperatur

  • ½ tsk vanille pasta eller kornene fra ¼ vanillestang

Fremgangsmåde:

Opvarm ovnen til 175℃.

Bland alle ingredienserne til karamellen i en lille gryde. Varm blandingen op indtil smør og sukker er smeltet. Bland nødderne i, og tag gryden af varmen.

Kom ca. en teskefuld af blandingen op i slip-let muffinforme, så det lige dækker bunden.

Bag kagerne i 10-12 minutter, indtil de er let gyldne. Køl kagerne af i 5-10 minutter inden de tages ud af formene. Lad kagerne køle helt af på en bagerist.

Smørcreme:

Bland alle ingredienserne i en skål og pisk smørcremen over vandbad, indtil den er let og luftig. Jeg satte skålen ovenpå en gryde med næsten kogende vand, uden at have varme under gryden, og jeg piskede med en en håndmikser.

Sprøjt smørcremen på undersiden af halvdelen af kagerne. Den anden halvdel lægges ovenpå dem med fyld, med bunden nedad.

Server kagerne med en god kop the eller kaffe.

Velbekomme!

Deep Fried Camembert

Brunch, Dinner, DessertsComment
Deep Fried Camembert

Deep Fried Camembert

I don't know the story about this dish. It might be French, but nevertheless it is very decadent and rich.

Picnic.

Picnic.

My parents have made deep fried camembert for me and my brother a few times. Oddly enough my brother loved it, even though he hates cheese. Well, he likes warm cheese on pizza, lasagne and in deep fried camembert. He is very weird, if you ask me...

My trip to Tomales Bay brought me to Marin French Cheese, where they made camembert, and to my surprise, they made a petit version, perfect for deep frying. We bought a bunch of small cheeses to bring with us home.

By the end of the day we opted for at small picnic by our hotel, instead of going out for dinner. I had brought some of my homemade bread and it paired perfect with the cheeses. There is nothing better than a quiet picnic with your loved one at sunset.

Serves 4.

Ingredients:

  • 2-4 small camembert, with the rind on (I used petit camembert  from Marin French Cheese)
  • 2 eggs
  • 1 cup breadcrumbs, fresh, panko or regular
  • oil, for frying
  • 4 slices good bread, toasted
  • blackcurrant jam 

Directions:

Put the breadcrumbs in a shallow bowl. Crack the eggs into another shallow bowl and whisk them together.

Dip each camembert into the egg, making sure to get it covered all over. Coat the cheeses with the breadcrumbs. Repeat with the rest of the camembert.

Heat the oil in a heavy bottomed saucepan until hot.

Gently drop two of the cheeses and fry until golden brown, turning once. Place the cheeses onto a piece of kitchen towel to remove excess oil.

Serve immediately on a slice of toasted bread with blackcurrant jam.

Enjoy!


Roasted Butternut Squash Soup

Appetizer, Dinner, Holiday, Soup, VegetablesComment
Roasted Butternut Squash Soup

Roasted Butternut Squash Soup

Dansk udgave

First time I encountered a butternut squash was after moving to the US. Every fall I would see piles of this oddly shaped beige vegetable in the grocery store. They were hard like a pumpkin, but didn't look like the pumpkins I knew from back home. Pumpkin was not something we cooked with in Denmark, at least not in my family. My mom had made pumpkin jam and sugar pickled pumpkin, but the recipes is long gone.

I got to taste a butternut squash soup at a friends house one Thanksgiving, and I kinda liked it, but I was on the sweeter side, and as I recall it, it had nutmeg or some warm spices in it. 

I don't have to tell you, but I'm not a fan of pumpkin pie, but I will never pass on a Pumpkin Spice Latte. It must be the coffee that make me love it.

I like a fresher and lighter taste to my butternut squash soup, so I was delighted when I found a soup with few ingredients, including an apple, on CHOW.com.  I made a few changes, and got a crisp fresh butternut squash soup, that even my squash-hating husband liked. He ranked it up with his favorite, spicy peach soup, so I must have hit something right with this soup.

Here is my version:

Serves 4 for dinner or 6-8 for an appetizer.

Ingredients:

  • 2 medium butternut squash, halved lengthwise and seeded

  • 2 tablespoons butter

  • 1 Granny Smith apple, peeled and diced

  • 1 small onion

  • 4 fresh sage leaves

  • 3 teaspoons chicken paste*

  • 4 cups (about 1 liter) water

  • 2 teaspoons salt or taste

  • ¼ teaspoon freshly ground black pepper or taste

Garnish:

  • ½ cup toasted pumpkin seeds

  • ½ leek, thinly sliced

  • a few sugar pickled chilies

Directions:

Preheat the oven to 425°F (220℃). 

Line a baking sheet with aluminum foil. Place the squash pieces cut-side up on the baking sheet. Brush them with about 1 tablespoon of butter all over the cut side. Season generously with salt and pepper. Roast squashes for about 50 minutes, until knife tender and browned on the edges.

Melt the remaining butter in a Dutch oven over medium heat. Add the apple and onion, and cook while stirring until softened about 5 minutes. 

When the squash has cooled somewhat, scoop the flesh out with a spoon into the sautéed onions and apples. Discard the skins.

Add chicken paste and water, and bring it to a simmer over medium-high heat. Reduce the heat and let the soup simmer for about 15 minutes, until the flavors are blended. Season with salt, pepper and fresh sage. 

Purée the soup in batches in a blender** until smooth. (You can also use an immersion blender.) Season with more salt and pepper if needed. 

Serve the soup hot with your favorite garnish and a slice of good bread.

* You can use chicken or vegetable stock instead of the paste and water. 

**Be careful when blending hot liquids, it can make the lid pop off, and you may risk getting serious burns on you skin. You can remove the small cap on you blender lid and cover the lid with a clean kitchen towel. You need to hold on to the lid and towel. This will let the steam from the hot soup escape and avoid the lid from popping off. You can also get blenders like the Vitamix, where you can blend hot liquids, without any hassle.


The Danish version:

Bagt Butternut-Græskar-Suppe

Til 4 personer til aftensmad eller 6-8 personer til forret.

Ingredienser:

  • 2 mellemstore butternut græskar, halverede på langs og fjern frøene

  • 2 spsk smør

  • 1 Granny Smith æble, skrællet og skåret i tern

  • 1 løg

  • 4 friske salvieblade

  • 1 liter kylling eller grøntsagsboullion

  • 2 tsk salt, eller efter smag

  • ¼ tsk friskkværnet sort peber, eller efter smag

Tilbehør:

  • ½ dl ristede græskarkerner

  • ½ porre skåret i tynde skiver

  • lidt sukkersyltede chilier

Fremgangsmåde:

Opvarm ovnen til 220℃. 

Kom staniol på en bageplde/bradepande, og sæt de flækkede græskar her på, med skærefladen opad. Pensl dem med lidt smeltet smør, og krydder med rigeligt salt og peber. Bag græskarne i ca. 50 minutter, indtil de er møre og brunede i kanten. De er møre, når du let kan stikke en kniv ned i kødet.

Smelt resten af smørret i en stor tykbundet gryde, og sauter løg og æbletern heri indtil de er bløde, ca. 5 minutter. 

Når græskaret er kølet lidt og det er til at håndtere, skrab kødet ud af skallen og ned til løg og æbler. Smid græskarskallerne ud.

Tilsæt bouillonen og kog suppen op. Lad suppen simre i ca. 15 minutter. Krydr med salt, peber og salvie. 

Blend suppen i en blender eller med en stavblender. Pas på med at blende den varme suppe, da det kan give skoldninger, hvis låget hopper af. Man kan evt. tage det lille låg af blenderen og dække hullet til med et viskestykke, men der blendes. 

Smag suppen til med salt og peber en sidste gang, og server den brændvarm med det ønskede tilbehør.

Velbekomme

NB. Man kan få blendere som f.eks. Vitamix, som gør det muligt at blende varme supper uden problemer.

Mazarin Cake

Cake, Desserts2 Comments
Mazarin Cake

Mazarin Cake

Dansk Udgave

Mazarin cake is a classic Danish cake made with a pie crust, almond filling and dark chocolate on top. It first appeared in a cookbook in 1888, the time period (the 1800's) where the upperclass in Copenhagen started to go to patisseries. The Danish Patisseries was greatly influenced by German and Austrian ones. The cakes were named after royalty or historic figures, mostly French sounding names. This cake was named after The Italian cardinal Mazarin.

Even though Mazarin cake started off as a fancy cake, my first encounter with the cake was as a cheap store bought cake. A cake that you find in most supermarkets, kiosks and gas stations. The kind of cake you only buy, when you had no other options.

As I got older, working at a bakers shop, I got a new appreciation for the mazarin cake.  The Mazarin cake had a flaky pie crust, the filling tasted more like marzipan and the decoration was thoughtful and pretty. Suddenly the Mazarin cake was elevated to a delicious treat worth sinking you teeth into.

To this day I still love this cake, but I rarely make it, because my version calls for a lot of marzipan. Marzipan is an ingredient I love, but also one that I am very picky about. My favorite marzipan for eating raw is the one made by the Danish company “Summerbird," - btw they also make the best chocolate ever!  The marzipan I use for baking is "ren rå" (pure raw) from "Odense." 

The Mazarin cake can easily be made in advance, a couple of days even, but the fresher the cake, the crispier the crust will be. The original cake was decorated with dark chocolate and candied petals from violets, but I dressed it up a notch with fresh berries. 

I played a little with the crust. I have been looking for a crispy, flaky pie crust, but I haven't been completely satisfied with the ones I have tried previously. 

But this one is close to perfection. Crispy, flaky, buttery with some texture to it. Next time I want to make my strawberry tart, I'll use this crust. I know that it works perfectly when baking it with the cake-part in it. 

Makes two 8 inch cakes.

Ingredients:

Crust:

  • 100 g almonds, grounded to flour
  • 200 g all-purpose flour
  • 150 g butter, cold and cut into small cubes
  • 100 g confectionary sugar
  • 1 egg
  • ½ teaspoon vanilla paste

Filling:

  • 300 g marzipan (almond pate)
  • 200 g sugar
  • 150 g butter
  • 4 eggs

Topping:

  • 100 g dark chokolate, use a good one like Valrhona
  • 40 g blød nougat, optional (you can use 1 tablespoon  non-flavored vegetable oil in stead) 
  • fresh brerries

Directions:

Crust:

Ground the almonds to a flour in a food processor. Add flour and sugar and mix it well. Add butter, egg and vanilla paste, and pulse until it almost come together as a  dough. Form the dough into two disks and refrigerate for a about 2 hours. The dough is more sticky than a normal pie crust.

Roll out each dough disks between 2 sheets of parchment paper. You need to have a bigger piece of dough than the pie pan you are using. Put the rolled dough into the freezer for a minimum of 30 minutes, to make the butter freeze up. This will prevent the crust from shrinking while baking.

Preheat the oven to 360℉ (180℃).

Take the dough out when you are ready with the filling. Let the dough settle a few minutes on the counter before putting it in the pan. Carefully place the dough into the pan, make sure to get it into the corners. Cut off any excess dough. Do not stretch the dough, this will course shrinking.

Filling:

Mix the marzipan with sugar and butter until fully incorporated. Mix in one egg at a time. Fill the crusts half up with the marzipan filling. Smooth the filling out for an even baking.

Bake the cakes for about 30 minutes, until the cakes are golden brown. 

Let the cakes cool in the pans on a wire rack.

Topping:

Melt the chocolate (and blød nougst) and pour a thin layer on top of the cooled cake. Decorate with fresh berries and serve it with a nice cup or tea or coffee

Enjoy!


The danish version:

Mazarintærte

Ingredienser:

Tærtebund:

  • 100 g mandler, malet til mel (i en foodprocessor)
  • 200 g hvedemel
  • 150 g smør, koldt og skåret i små tern
  • 100 g flormelis
  • 1 æg
  • ½ tsk vanilla pasta eller kornene fra ½ vanilliestang

Mazarinmasse:

  • 300 g marcipan (ren rå)
  • 200 g sukker
  • 150 g smør
  • 4 æg

Topping:

  • 100 g god mørk chokolade (jeg brugte Valrhona)
  • 40 g blød nougat
  • friske bær

Fremgangsmåde:

Tærtebund:

Kom mandlerne i en foodprocessor og mal dem til mel. Bland mel og sukker i. Tilsæt smør og vanille og pulse (kør foodprocessoren i få sekunder ad gangen) indtil dejen kun lige samler sig. Form dejen til to flade cirkler (hvis du laver runde tærter), pak dem ind i plastik film, og lad dem køle i ca. 2 timer. Dejen er mere klistret end en almindelig mørdej.

Rul dejen ud mellem to stykker bagepapir, lidt større end tærteformen du vil bruge. Læg den nu udrullede dej i fryseren i mindst 30 minutter, dette vil hindre at tærtebunden krymper, når den bages.

Opvarm ovnen til 180℃.

Tag dejen ud, når du har lavet mazarinmassen. Lad dejen hvile på køkkenbordet i få minutter, så den bliver lettere at få ned i formen. Læg dejen i tærteformen, og sørg for den kommer helt ud i hjørnerne, men pas på at du ikke strækker dejen, da det gør at tærtebunden trækker sig sammen ved bagningen.

Mazarinmasse:

Bland marcipan med sukker og smør intil du har en homogen masse. Bland eet æg i ad gangen, og sørg for det er helt blandet sammen, inden du tilsætter det næste. Fyld mazarinmassen i tærteformene. De skal fyldes ca halvt op. Glat massen ud med en paletkniv, så du får en fin glat overflade.

Bag kagen i ca 30 minutter indtil kagen er flot og mørk gylden. Køl kagen helt af før den pyntes.

Topping:

Smelt chokolade og nougat og kom et tyndt lag på kagen. Dekorer med friske bær.

Velbekomme!