Sweet • Sour • Savory

Sweet • Sour • Savory

Food blog on scandinavian style food done right.

Beer Can Chicken

Dinner, Meats, PoultryComment
Beer Can Chicken

Beer Can Chicken

Beer Can Chicken is one of the best ways to cook a chicken on the grill/BBQ. The chicken stays juicy, and you get the best crispy skin.

I use a poultry roaster instead of the beer can, since you do not know what’s in the color on the beer can, and if it will migrate into the roasting chicken.

Ingredients

  • 1 whole chicken
  • 2 tablespoons butter, room temperature 
  • 2-4 tablespoons salt
  • ½ teaspoon lemon pepper
  • 1 lemon
  • 1 cup white wine
  • 1 teaspoon fresh thyme
  • 2 cloves garlic

Directions:

Preheat your grill/BBQ to medium high heat, the chicken need to be cooked at indirect heat, meaning no flames or coal directly under the bird. 

Zest the lemon, and add it to the butter together with the thyme.

Remove neck and giblets from chicken and discard them. Pat the chicken dry with paper towels. Rub chicken lightly with salt inside and put the chopped up lemon inside too. Put the spiced butter in between the skin and chicken breast and drumsticks. Set aside.

Pour the wine into the poultry roaster  and put the garlic in there too. place the chicken on the stand. Rub a good amount salt all over the chicken. Transfer the chicken to the grill/BBQ.

Cook the bird for 50-65 minutes or until the thigh juice runs clear, when poked with a sharp knife. Remove the bird from grill/BBQ and let rest for 10 minutes before carving. (The center temperature should be 165℉ (75℃).

Enjoy!


Pizza

Dinner1 Comment
Potato Gruyere Pizza

Potato Gruyere Pizza

There are different way to roll out/form the pizza. Normally I just roll the dough out with a rolling pin but this dough is so soft and so easy to just spread out using your hands. Of course you can be a real pizza maker and toss it in the air, but I know my limitations.

When the dough is shaped I always sprinkle some cornflour on the pizza peel, this makes it easier to slide the pizza onto the grill safely and without dropping all the toppings.

I have a VillaWare Pizza Grill, it's basically a pizza stone on a stainless steel frame. But the stone is food certified, and the frame stops the pizza from sliding off, when taking it off. After getting this Pizza Grill, we have got the best pizza's ever. We even use the pizza grill to reheat leftover pizza, to get the crisp.

I bake my pizza at 600℉ (315℃) for about 7 minutes. 

I love simple pizze, I love you can taste all the ingredients.

Potato Gruyere Pizza

The potato gruyere pizza is a white pizza, with only potatoes, cheese, olive oil, rosemary and a sprinkle of salt. It's really simple to make. 

Wash 2-3 potatoes, and thinly slice them into a bowl with ice water.  Slice the cheese, and spread it on the pizza dough. Pad dry the potato slices and lay them on top of the cheese. Sprinkle with olive oil and chopped fresh rosemary. Bake the pizza on the grill for about 7 minutes on a pizza stone.   

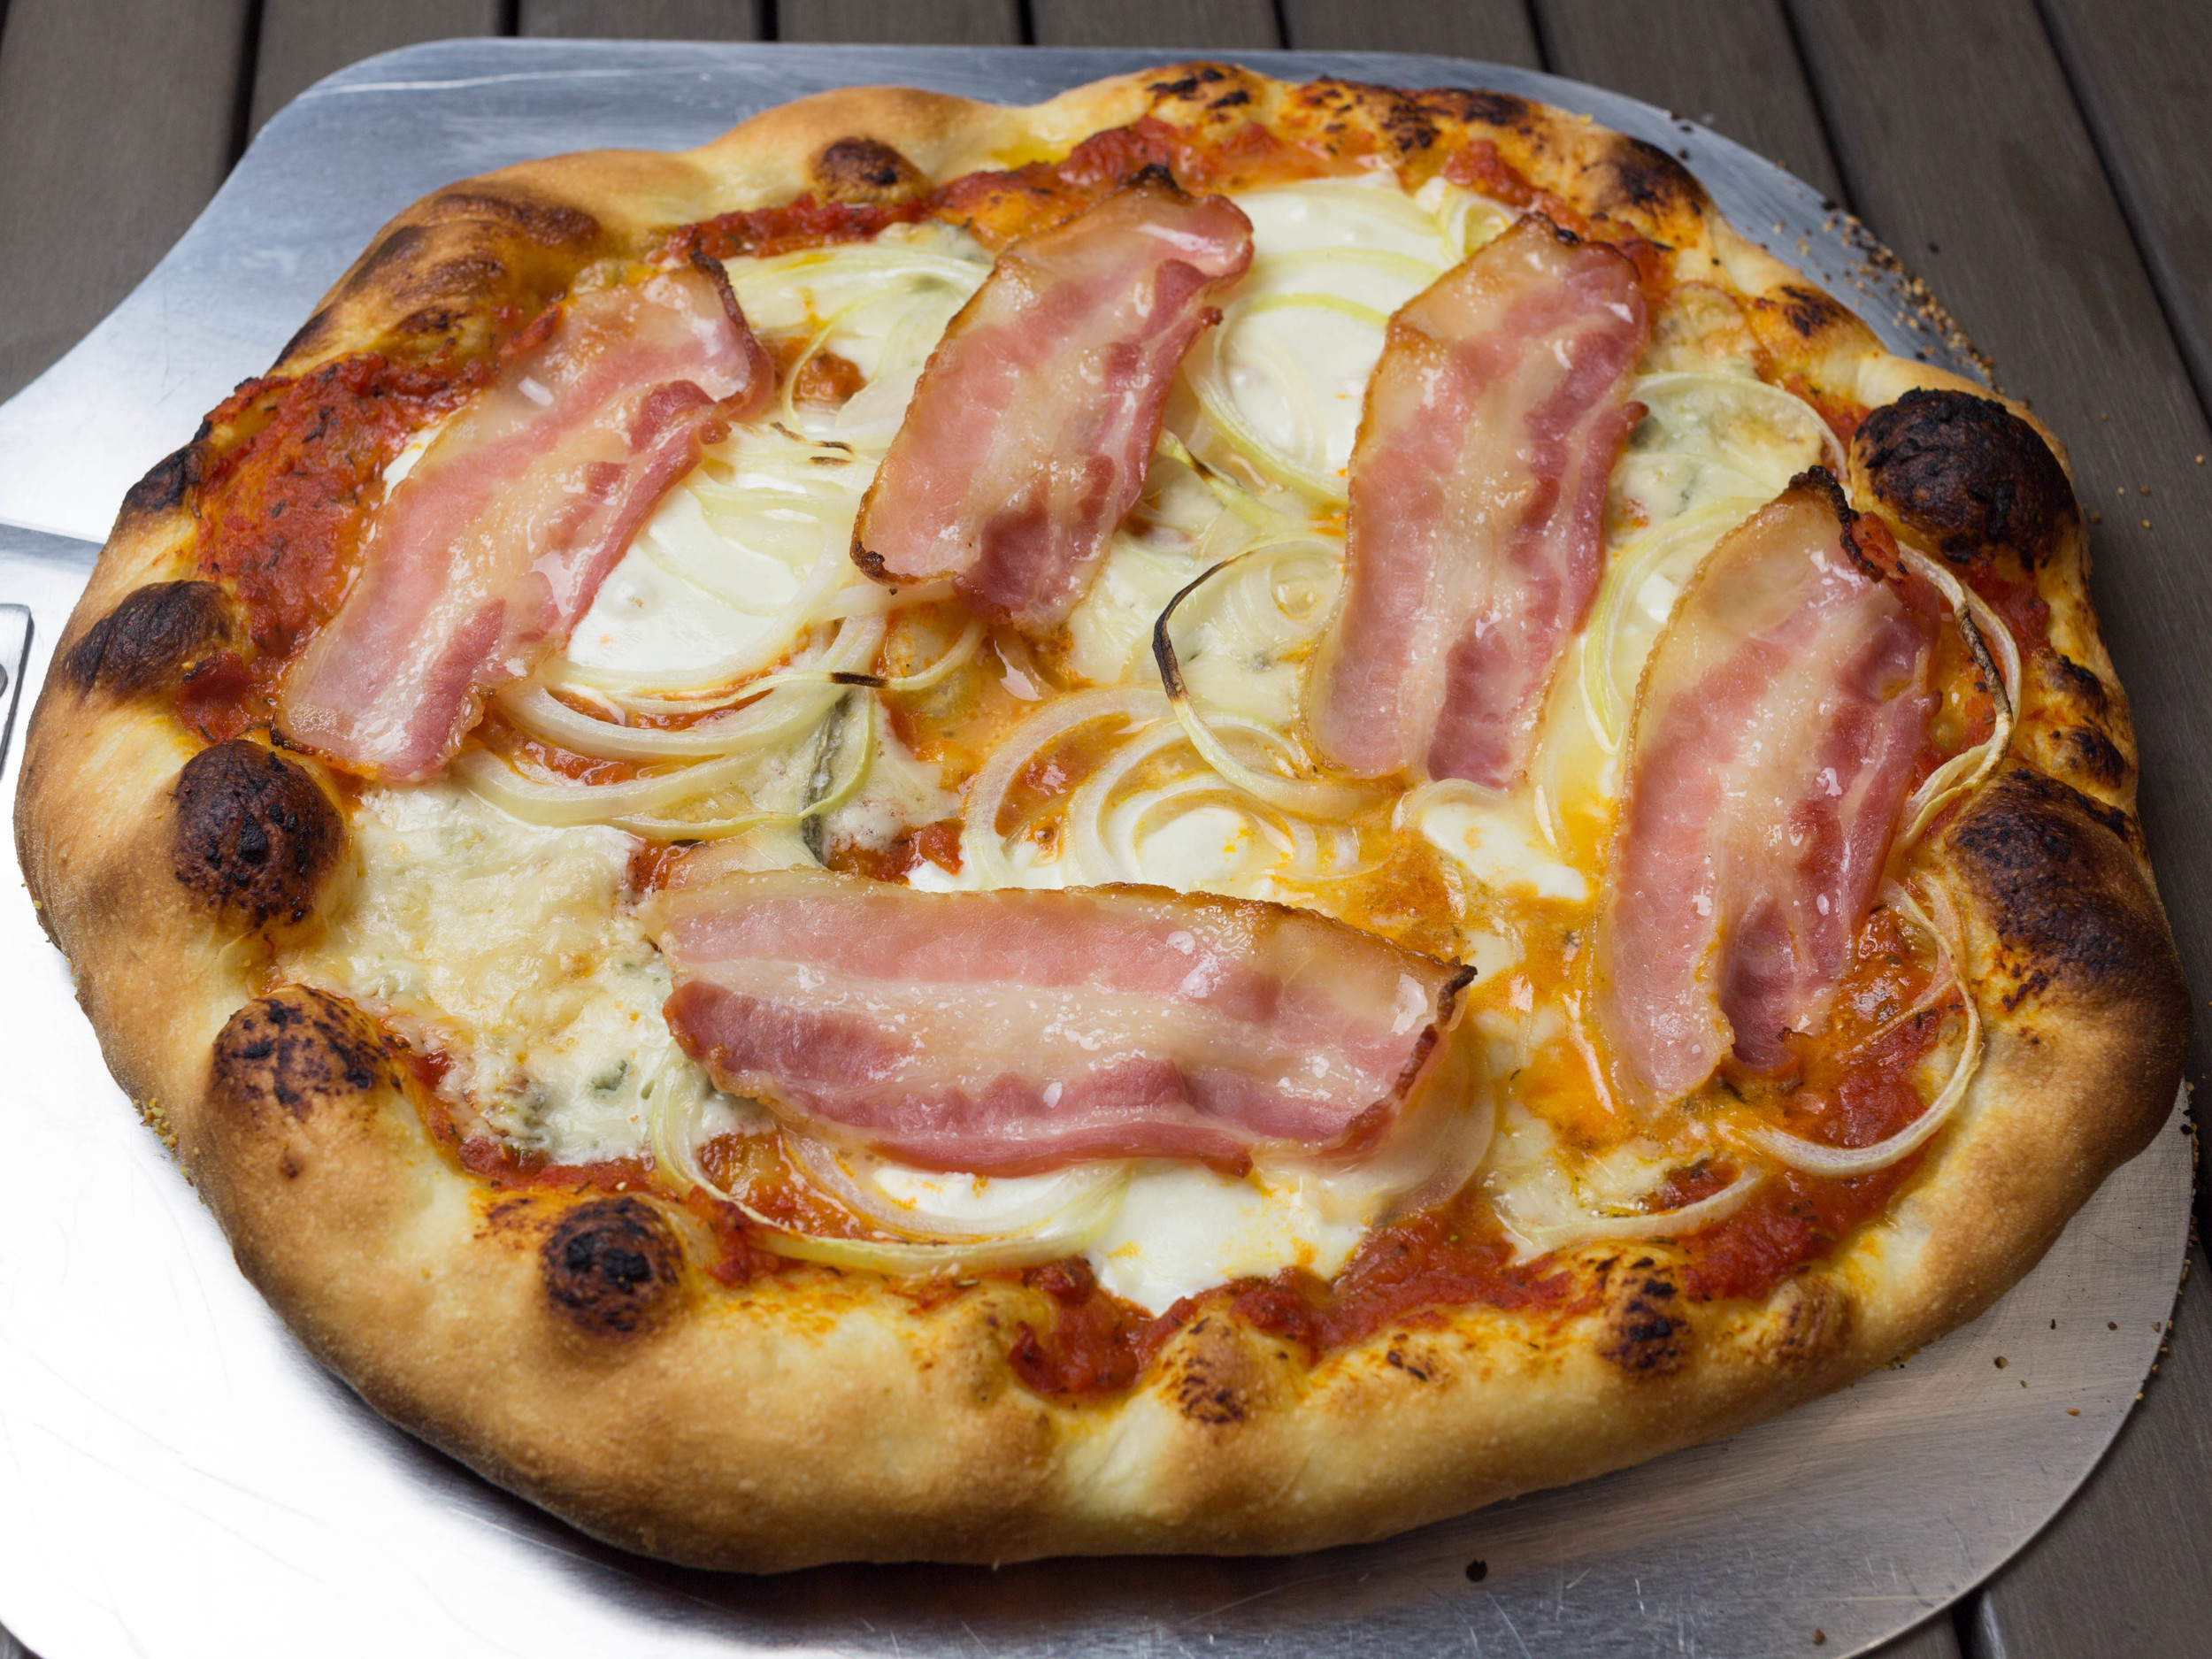
Bacon, Gorgonzola and Onion Pizza

Bacon, Gorgonzola and Onion Pizza

Another favorite is

Bacon, Gorgonzola and Onion Pizza

Pizza dough

Tomato sauce:

  • 1 tablespoon olive oil

  • ¼ onion, peeled and cut into ¼-inch pieces

  • 1 garlic cloves, peeled and finely minced

  • ½ can diced Italian tomatoes

  • 1-2 tablespoons tomato paste

  • thyme

  • rosemary

  • salt & pepper

Heat the oil in a small saucepan on medium heat. Add onions and garlic, cook until onions are soft, about 4 to 5 minutes, stirring occasionally. Add tomatoes and spices. Increase the heat to medium-high and bring to a boil. Let sauce simmer 5-10 minutes - the longer, the better taste. Taste and season with salt and pepper.

Topping:

  • onion, thinly slices

  • 3-4 slices bacon

  • 4 slices mozzarella, use a good one

  • 2-4 tablespoons gorgonzola

Spread the cooled tomato sauce on the pizza, add the cheese and onions. Top it of with bacon.

Bakes for about 7 minutes.


Pizza Dough

Bread, DinnerComment
Breakfast Pizza and a hungry Gizmo

Breakfast Pizza and a hungry Gizmo

We like to bake our own pizzas (ok, they are called pizze in plural). But to bake your own pizza, you need a good pizza dough. I have tried several through the years, but no one has given me a better crust than the one from kvalimad.dk

Kvalimad, has different options depending on how good you are to plan ahead, but I really like his start in the morning dough. 

10 hour pizza dough

Makes 4 thin crust pizze.

Ingredients:

  • 625-650 g all-purpose flour
  • 450 ml (17/8 cups) water 
  • 50 ml olive oil
  • 2 teaspoons (14 g) salt
  • 3 g live yeast or about ¼ teaspoon dry yeast

Directions:

Dissolve the yeast in the water, if using dry yeast sprinkle a few pinches sugar in the water too. Add the rest of the ingredients and knead the dough for about 5 minutes in a stand mixer. (Knead a little longer if kneading by hand). The dough should now be somewhat sticky and elastic. 

Cover the bowl with plastic wrap and let the dough rise for about 8 hours on the kitchen counter.

Pour the dough onto a lightly floured workspace, fold the dough over 3-4 times and divide the dough into 4 rounds 

Sprinkle the rounds with flour and let them rise for another 2 hours, covered.

Now the dough is ready to use. 


The One Hour Dough

Makes 4 thin crust pizze.

This dough works, but it won't have the same crust and flavor, but it's still better than a frozen pizza from the grocery store.

Ingredients:

  • 625-650 g all-purpose flour
  • 450 ml (17/8 cups) water 
  • 50 ml olive oil
  • 2 teaspoons (14 g) salt
  • 1 tablespoon vinegar
  • 12 g live yeast or about 3 g dry yeast

Directions:

Dissolve the yeast in half of the water in the bowl of the stand mixer. If using dry yeast sprinkle a few pinches sugar in the water too.

Bring the rest of the water to a boil. Add oil, salt and vinegar to the bowl with half of the flour. Mix in half of the hot water. Add the rest of the flour and knead the dough for about 10 minutes in the stand mixer. Put the hot water into the mixing bowl for the stand mixer. (Knead a little longer if kneading by hand). The dough should now be somewhat sticky and elastic. 

Cover the bowl with plastic wrap and let the dough rise for about 30 minutes on the kitchen counter.

Pour the dough onto a lightly floured workspace, fold the dough over 3-4 times and divide the dough into 4 rounds 

Sprinkle the rounds with flour and let them rise for another 30 minutes, covered.

Now the dough is ready to use. 

Source: Kvalimad.dk

Koldskål - Cold Sweet Buttermilk Soup

Desserts, Dinner, Soup3 Comments
Strawberry Koldskål - Cold Sweet Strawberry Buttermilk Soup

Strawberry Koldskål - Cold Sweet Strawberry Buttermilk Soup

Koldskål, or kærnemælkskoldskål, is a sweet cold soup made from buttermilk. Koldskål is mostly eaten in the summer months. It's normally a dessert, but is also served as a light and fast dinner on a hot day.

My mom made koldskål with eggs, sugar, vanilla and buttermilk, but I make mine without eggs, and I think it's just as good. Sometimes I add some whipping cream to make it more creamy. Serve the koldskål the traditional way with lemon juice, kammerjunker and an iceberg (raw meringue), or with a sprinkle of granola. Koldskål is easy to change up by adding your favorite fruit, I used Strawberries here.

This is my first time making koldskål in my vitamix, and I think I got way to much air incorporated this time, Next time, I'll mix the koldskål at a lower speed, to avoid all the bubbles. 

Ingredients:

  • 1 quart buttermilk

  • 170 ml (6 fl oz) yogurt with vanilla

  • 1 dl whipping cream (optional)

  • 1 lemon, the juice of, (I used the juice of 2 meyer lemons)

  • 85 g sugar (start with a little less, and add more if needed)

  • 1 vanilla pod, the seeds from, or 1 teaspoon vanilla paste

For Strawberry koldskål, add 6-12 strawberries.

Directions:

Put all the ingredients into a blender, and blend until you have a homogenous mixture. Add more sugar and/or lemon juice if needed.

Serve the koldskål cold and with the topping of your liking.

Enjoy!

Koldskål - Cold Sweet Buttermilk Soup

Koldskål - Cold Sweet Buttermilk Soup


Kammerjunker - Twice-Baked Cookies

CookiesComment
Kammerjunker - Twice-Baked Cookies

Kammerjunker - Twice-Baked Cookies

Kammerjunker, or twice-baked cookies, is a summer treat. Danes love to eat koldskål (cold buttermilk soup) on hot summer days. And we eat these kammerjunker with the koldskål. 

Here is my recipe for kammerjunker.

Ingredients: 

  • 250 g all-purpose flour 
  • 75 g sugar 
  • 1 teaspoon baking powder 
  •  115 g butter, salted and cold 
  • 1 vanilla pod (2 teaspoons vanilla paste) 
  • 1 egg
  • 1 lemon, the zest of
  • ½ teaspoon cardamom
  • ½ dl milk
  • A pinch of salt 

Directions: 

Scrape the seeds from the vanilla bean and mix them with about 1 teaspoon of the sugar to help separate the seeds in the mixture.

Mix all the dry ingredients including vanilla and lemon zest in a bowl. Add the cold cubed butter and mix it in with a pastry cutter until it's all combined, resembling grated cheese.

Add the egg and mix using hands, to make the dough come together. Add the milk and mix the dough until it's just combined smooth. Let the dough rest in the refrigerator for about an hour.

Preheat the oven to 350℉ (175℃).

Roll the dough into small balls (2 cm or 0.8 inch diameter) and put them on a parchment lined baking sheet and bake them for 10 minutes. 

Lower the heat to 215℉ (100℃).

Take the cookies out of the oven and immediately slice them into halves with a serrated knife. Bake the cookies again, this time with the cut-side up for another 45 min. until they are dry, like you would do with biscotti’s.

Let the cookies cool completely on a wire rack before storing in an airtight container. 

Eat the kammerjunker with "koldskål" or as a snack.

Enjoy!